


Minting NFTs through API using Truffle & Rinkeby
- BHANU MOKKALA
You need the image / art work / clip to be uploaded to IPFS. You can use any of the IPFS clients that allow you to upload the asset and pin it which will make the asset available for anyone to access through a link. I am using Pinata Cloud for IPFS
It is the season of NFTs and DeFi. In case you have been living under a rock then you need read more about NFTs and DeFi using the following links.
Now that you understand the terms, let us understand how NFTs are minted. NFT market is definitely moving from a few minters to tools & techniques for content creators to mint NFTs on their own.
The following are the key steps in minting a NFT.
- You need the image / art work / clip to be uploaded to IPFS. You can use any of the IPFS clients that allow you to upload the asset and pin it which will make the asset available for any one to access it through a link. I am using Pinata Cloud for IPFS.
- You need some test ethers on your Metamask Wallet. Once you installed Metamask Google Extension, load test ethers using the Rinkeby faucet. Also, load some LINK on your Rinkeby testnet address.
I built these APIs on top of an existing repo by Patrick Collins. Check out the repo in the below GitHub link.
The above example deals with minting a collection of ‘Dungeons and Dragons’ to Rinkeby. It has the following key steps.
Step 1:
truffle migrate –reset –network rinkeby
Step 2:
truffle exec scripts/fund-contract.js –network rinkeby
Step 3:
truffle exec scripts/generate-character.js –network rinkeby
Step 4:
truffle exec scripts/get-character.js –network rinkeby
Step 5:
truffle exec scripts/set-token-uri.js –network rinkeby
Steps 1 & 2 deal with setting up Rinkeby connection and migrating the contracts related to NFT creation to Rinkeby Testnet. Steps 3, 4 & 5 include executing appropriate functions on the migrated contracts to randomly select characters and setting up metadata URI for the minted NFT. Please go through the README.md of the above repo to understand other set up details.
The idea is to build a NodeJS application that will use the above discussed steps. We can a user Node’s Child Process to execute truffle commands on the CLI. Below is an example of wrapping up the first step in the Child Process call.
app.get(‘/pushcontract’, async(req, res) => {
try {
const child = await spawn1(‘truffle migrate –reset –network rinkeby’, [], {shell: true});
console.log(child.toString());
res.send(‘Migrate contracts’);
} catch (e) {
console.log(e.stderr.toString())
}
})
Sample code of executing child process
Just like above sample, we can create code to execute the remaining steps mentioned above to complete the minting process. Prior to executing these steps, we need to create the required contract and migrate it to Rinkeby testnet.
We can also create contract needed for minting the NFT using file manipulation in NodeJS. We make changes to the ‘template’ contract on the fly using NodeJS fs library and then execute the truffle commands to migrate the contracts.
app.post(‘/createcontract’, async(req, res) => {
console.log(‘filename’, req.body.filename);
files = fs.readdirSync(‘./contracts’);
console.log(files);
files.forEach(file => {
const fileDir = path.join(‘./contracts/’, file);
console.log(fileDir);
if (file !== ‘Migrations.sol’) {
try {
fs.unlinkSync(fileDir);
} catch (error) {
console.log(error);
}
}
})
fs.copyFileSync(‘sample.sol’, ‘./contracts/’ + req.body.filename + ‘.sol’);
const data = fs.readFileSync(‘./contracts/’ + req.body.filename + ‘.sol’, ‘utf8’);
let result = data.replace(/DungeonsAndDragonsCharacter/g, req.body.filename);
fs.writeFileSync(‘./contracts/’ + req.body.filename + ‘.sol’, result, ‘utf8’);
fs.unlinkSync(‘./migrations/2_mycontract_migration.js’);
fs.copyFileSync(‘2_mycontract_migration_backup.js’, ‘./migrations/2_mycontract_migration.js’);
const data1 = fs.readFileSync(‘./migrations/2_mycontract_migration.js’, ‘utf8’);
let result1 = data1.replace(/DungeonsAndDragonsCharacter/g, req.body.filename);
fs.writeFileSync(‘./migrations/2_mycontract_migration.js’, result1, ‘utf8’);
res.send(‘created contract’);
})
Sample code of creating Contracts from the sample
In the above code block, we are copying sample.sol to contracts folder after deleting all the other existing contracts from the contracts folder. After copying sample.sol to contracts folder with desired name, we selectively replace contents of the newly created contract based on the request received in the express API call. The NFTs minted through the above process can be viewed on the opensea Rinkeby testnet gallery.
As discussed above, before we get ready with minting, we need to pin the image / art work to IPFS. We can build APIs for uploading and pinning the image to IPFS using Pinata, there are other ways as well. Please go through their docs to identify the APIs for uploading and pinning the image. Once the image is successfully uploaded Pinata APIs return CID which is a unique identifier for the uploaded file / image.
https://ipfs.io/ipfs/xxxxxxxxxxxxxxxxxxxxxxxxxxxxxxxxx?filename=filename.png
The final URI looks something like above. The ‘XXX’ is where the unique CID will be. We need to embed the image URI inside metadata JSON file before uploading the JSON file to IPFS. Please go through metadata folder in Dungeon & Dragons GitHub repo for more details on how the metadata JSON file should look like.
app.post(‘/upload’, upload.single(‘File’),function(req, res) {
console.log(req.file);
data.append(‘file’, fs.createReadStream(req.file.path));
data.append(‘pinataMetadata’, ‘{“name”:”‘ + req.file.filename + ‘”}’);
var config = {
method: ‘post’,
url: ‘https://api.pinata.cloud/pinning/pinFileToIPFS’,
headers: {
‘Content-Type’: ‘multipart/form-data’,
‘pinata_api_key’: <pinata api key>,
‘pinata_secret_api_key’: <pinata secret key>,
…data.getHeaders()
},
data : data
};
axios(config)
.then(function (response) {
console.log(JSON.stringify(response.data));
res.send(JSON.stringify(response.data));
})
.catch(function (error) {
console.log(error);
});
});
Sample code of uploading file to IPFS using Pinata
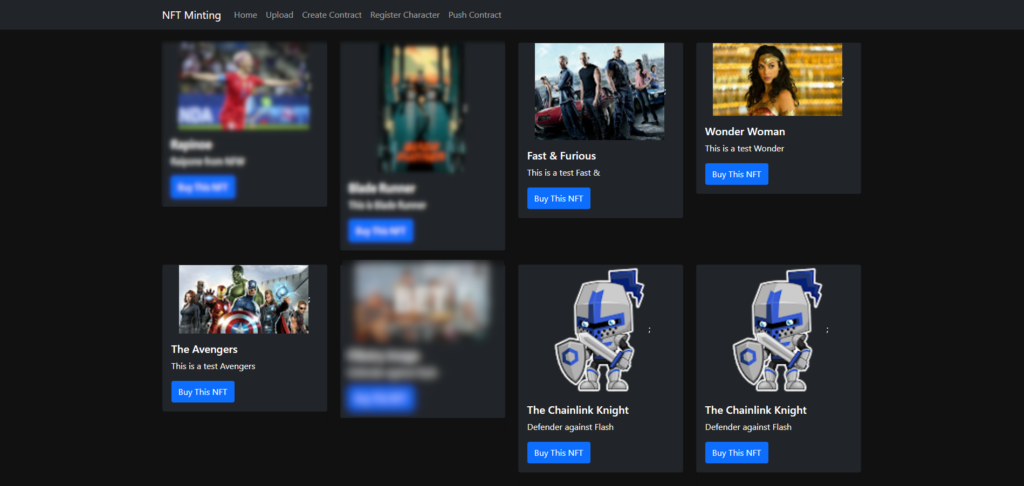
Apart from the above, you can also plugin the market place from the opensea using the opensea api. Below is the sample ReactJS code to fetch the NFTs from opensea and display in a NFT Gallery.
import React, {useState, useEffect } from ‘react’;
import { Container, Row, Col, Card, Button } from ‘react-bootstrap’;
import Imgix from ‘react-imgix’;
function MarketPlace() {
const [isLoading, setIsLoading] = useState(true);
const [NFTs, setNFTs] = useState([]);
useEffect(() => {
setIsLoading(true);
var requestOptions = {
method: ‘GET’,
redirect: ‘follow’
};
fetch(“https://testnets-api.opensea.io/api/v1/assets?owner=xxxxxxxxxxxxxxxxxxxxxxxxxxxxxxxxxxxxxx&offset=0&limit=50”, requestOptions)
.then(response => response.json())
.then((result) => {
console.log(‘Success:’, result);
setIsLoading(false);
const result1 = result.assets.filter(d => d.image_thumbnail_url !== null)
setNFTs(result1);
})
.catch(error => console.log(‘error’, error));
}, []);
if (isLoading) {
return (
<section>
Loading….
</section>
)
}
return (
<div style={{ backgroundColor: ‘#111’}}>
<Container className=’mt-4′>
<Row>
{NFTs.map(plan => (
<Col md={3}>
<Card bg=”dark” text=”white”>
<div style={{ textAlign: ‘center’}}>
{/* <Card.Img variant=”top” src={plan.image_thumbnail_url} style={{ width: “18rem”, height: “20rem” }} /> */}
<Imgix src={plan.image_thumbnail_url} sizes=”800vw” />;
</div>
<Card.Body>
<Card.Title>{plan.name}</Card.Title>
<Card.Text>{plan.description.replace(/^(.{20}[^\s]*).*/, “$1”)}</Card.Text>
<Button variant=”primary” onClick={() => window.open(plan.permalink, “_blank”)}>Buy This NFT</Button>
</Card.Body>
</Card>
<Card style={{ backgroundColor: ‘#111’ }}><br></br></Card>
</Col>
))}
</Row>
</Container>
</div>
);
}
export default MarketPlace
Code to extract minted NFTs from Opensea and display as a NFT Gallery
This approach gives a better understanding of what goes into minting an NFT. This is definitely not a production ready code. For that, we may have to take out truffle and build using web3js.
Happy Minting!!